
Clutch Lever Pivot Height Set Up
with aluminium bell housing.
The height of the Lotus elan clutch pedal can vary from car to car. Some owners will tell you the pedal is either low, high, or just right.
If it wasn’t for the fact that the writer had become involved with an Isuzu five speed gearbox conversion mated to an aluminium bell housing, this article probably wouldn’t have been written. There could be some takeaways here for you dear reader.
There are two main places where pedal height can be adjusted:
1: The Master cylinder actuating rod.
This item has one end which is threaded (Well, the better types are) and can be used to adjust the throw of the clutch pedal, but its action is limited.
2: Slave Cylinder/Clutch Lever Actuating Rod.
The slave cylinder rod is also threaded, and while its main function is to actuate the clutch lever, it is adjustable to provide correct free play for the clutch rod/lever, it can also have a role in how the clutch pedal feels as far as travel goes.
3: Slave Cylinder Bleeding.
Can play a large role in how effective the clutch operation is. If air is entrapped in the master cyl, slave cyl, or the clutch line, the pedal will feel spongy and you may need to press the pedal to the floor to achieve correct operation of the clutch. (There should be zero air in the clutch hydraulic system)
4: Worn pins and linkages.
One of the problems with older cars is that clutch linkages and pivot pins can become incredibly worn which can produce excessive movements of up to 3/8″ to 1/2″an inch of free play at the pedal, every bit of free play contributes to excessive movement where nothing happens until the free play or slack has been taken up.
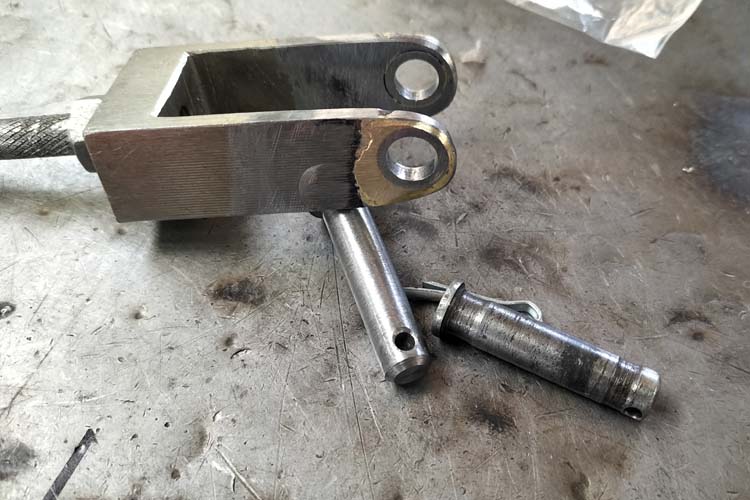
The image above: Refurbished clutch linkage bracket and clevis pin.
The holes in the bracket, as well as the old clevis pin (Shown on right) were extremely worn, the holes in the bracket were badly elongated. The subsequent movement at the end of the clutch pedal was close to 3/4″ of an inch.
To repair; the bracket was carefully drilled out oversize and two new small steel bushes were machined on the lathe and braze welded into place, a new clevis pin was also machined to fit, a small hole was drilled to accept the split pin retainer. The clutch pedal felt like new again.
And of course we should add that the reality is, that the work being outlined here is really only practical during a total engine and gearbox out for rebuild, or when a gearbox conversion – bell housing changeover is undertaken.
The clutch actuating lever pivot height can also have a significant influence on clutch operation. The pivot used in the original cast iron bell housing is of a “press fit” and designed to be a fixed height item, little can be done to adjust the height. But for those owners who have changed over to the aluminium bell housing will find that the original press fit pivot pin should NOT be used with the aluminium bell housing.
(Side note: A threaded pivot could in fact be installed into the original cast iron bell housing, as with the aluminium bell. The existing hole would need to be tapped to 3/8″ UNC, and a new pivot pin could be utilized with machined buttons or shims to increase the height in order to improve and adjust where the clutch actuation lever sits.)
With the new aluminium bell housing, a new pivot which has a much longer threaded spigot attached must be used. (Available from Burton UK) The bell housing is drilled and tapped to 3/8″ UNC thread, the new screw in pivot can then be installed. The threaded spigot must of course be cut to the correct length once the the pivot height is calculated and set.

The writer has installed a five speed Isuzu gear box into the S2 elan, a new aluminium bell housing was ordered from Burton UK to mate to the 5 Spd box. And this is where a few things were discovered that allowed the perfect clutch pedal height and feel to be achieved.
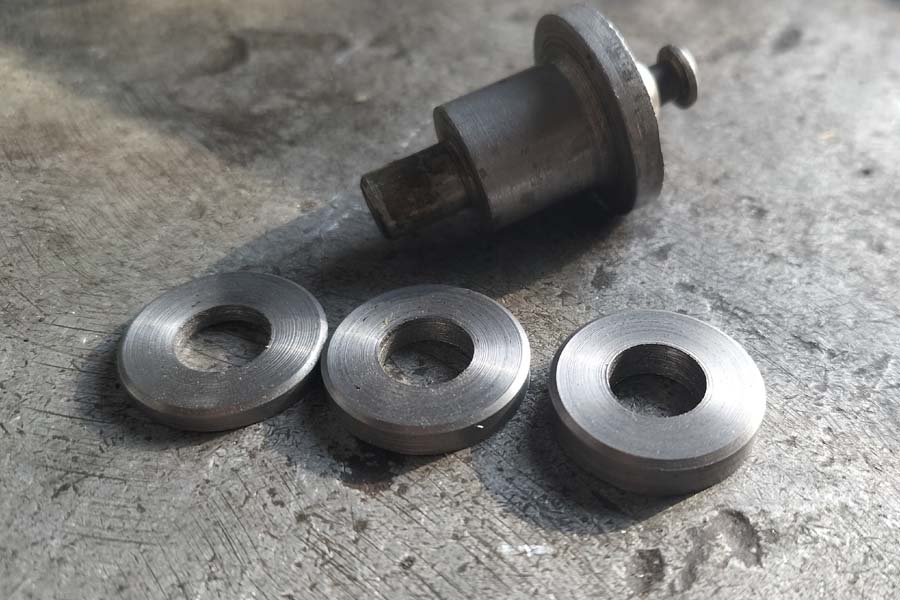
The photo above displays the original “press fit” style of pivot as used with the standard cast iron bell housing, but the main emphasis in this photo is on the various thickness of buttons or shims. (The old “press fit” pivot was NOT used with the aluminium bell housing).
Quite a bit of trial and error was used to ascertain which button gave the correct height, this of course meant two or three trial builds of the clutch assembly in the bell housing which was attached to the gearbox, and with one button (Starting with the thinnest) mounted under the pivot, the gearbox was installed onto the engine and temporarily held with two or three studs. The clutch lever was then operated loosely by hand (Not actually depressing the clutch) to see where maximum and minimum travel occurred. But in the haste of the process we forgot to take note of the actual button thickness used to get the best result. But from memory it was the centre button (3.8mm thick) in the photo above.
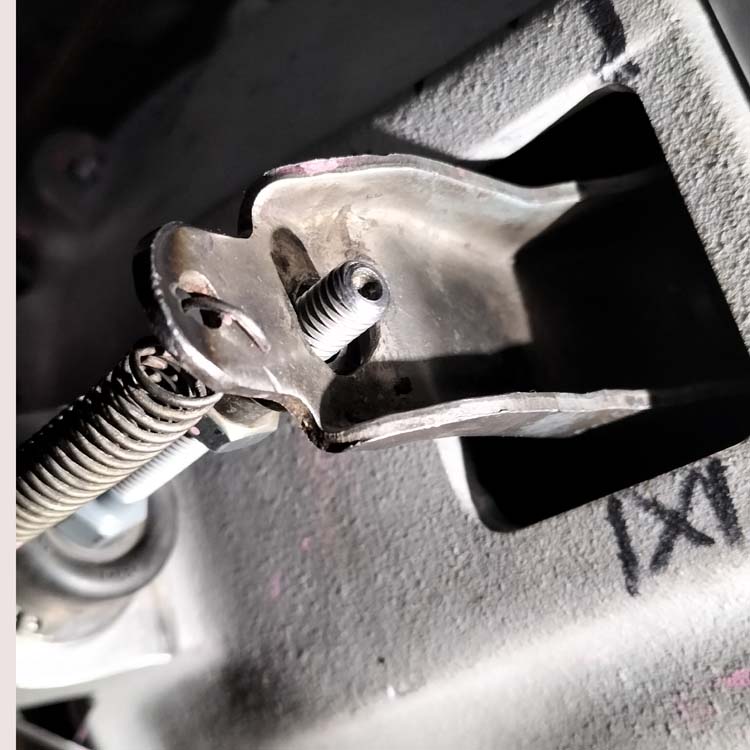
The photo above shows where the clutch lever sits now. Note that it sits in the middle of the housing aperture. (from the angle of the photo it looks more forward though) The black cross hatch lines show where the lever sat previously. (Rearward) It was back towards the rear, and when the clutch was actuated, the lip of the lever came very close to the rear edge of the bell housing opening.
If you think about the physics of the pivot, the shorter it is, the lower (Further back) the lever will sit, and the higher the pivot pin is the further forward the lever will sit… it just needed some trial and error to arrive at the best pivot post height, and optimum clutch lever position. After the clutch slave cylinder bleed, taking advantage of the adjusting rod on the master Cyl and the slave cylinder to fine tune the complete set up. It all combined to work very well.
Side note: Possible reader observations: No, we don’t use a rubber gaiter cover, and the hook of the return spring was not seated correctly on the lever at the time of the photo, but it is now.
So after a considerable amount of trial and error, we now have the perfect clutch pedal height with minimum pedal free play, and a well adjusted, and light to operate clutch pedal, probably the best its ever been.
There will be more discussion in the next part of the 5 speed project blog series.